


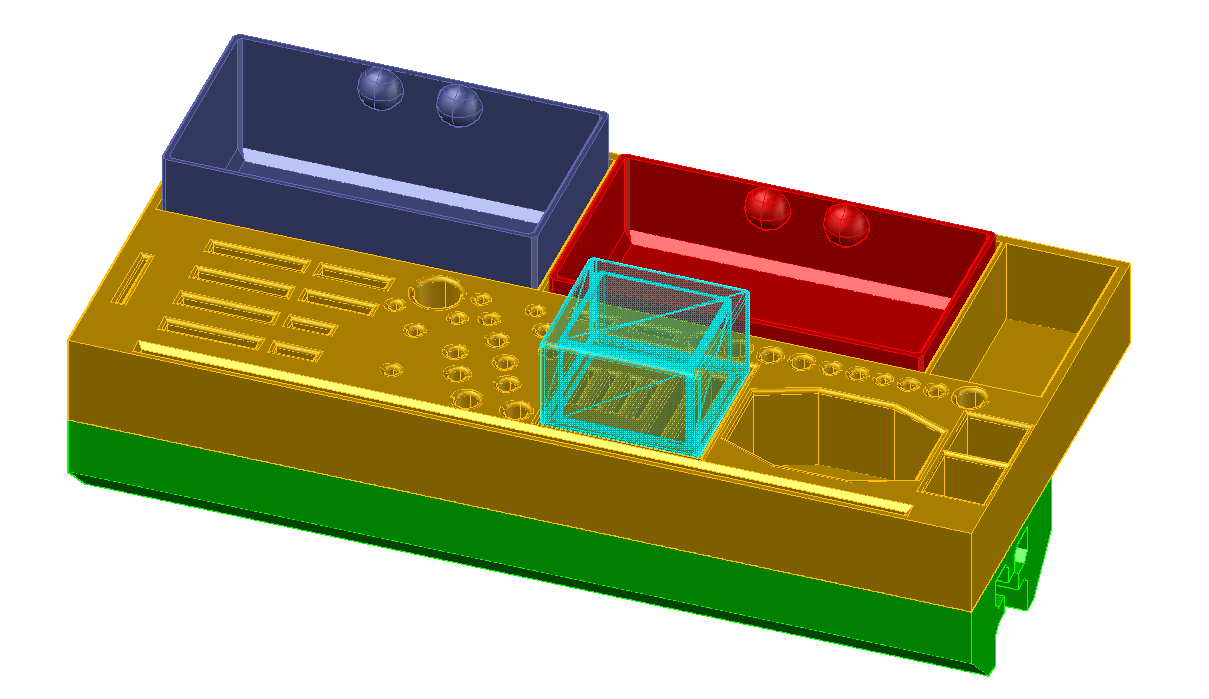


Here is the file by popular demand, my Magnetized 3D printer organizer. It was designed to hold all of my ender 3s and my Geeetech A30T repair hardware. Picture 3 shows the general layout of the tools and use for the cut outs. If you do not want the organizer to sit on your printer, you do not need to print the housing v2 file. I still find the stackable trays to be super helpful and I have a dozen around my work station.
You will get an email with a .zip folder. You will need a program like WinRAR to unzip it, load it into your slicer software and begin printing. The zip file will contain the following: Housing V2 (Green) Maintenance Tray V2 (Gold) SD Card Cap (Blue) Small Removable Stackable Tray (Red) Large Removable Stackable Tray (Purple) and Paint Scraper Divider (not shown)
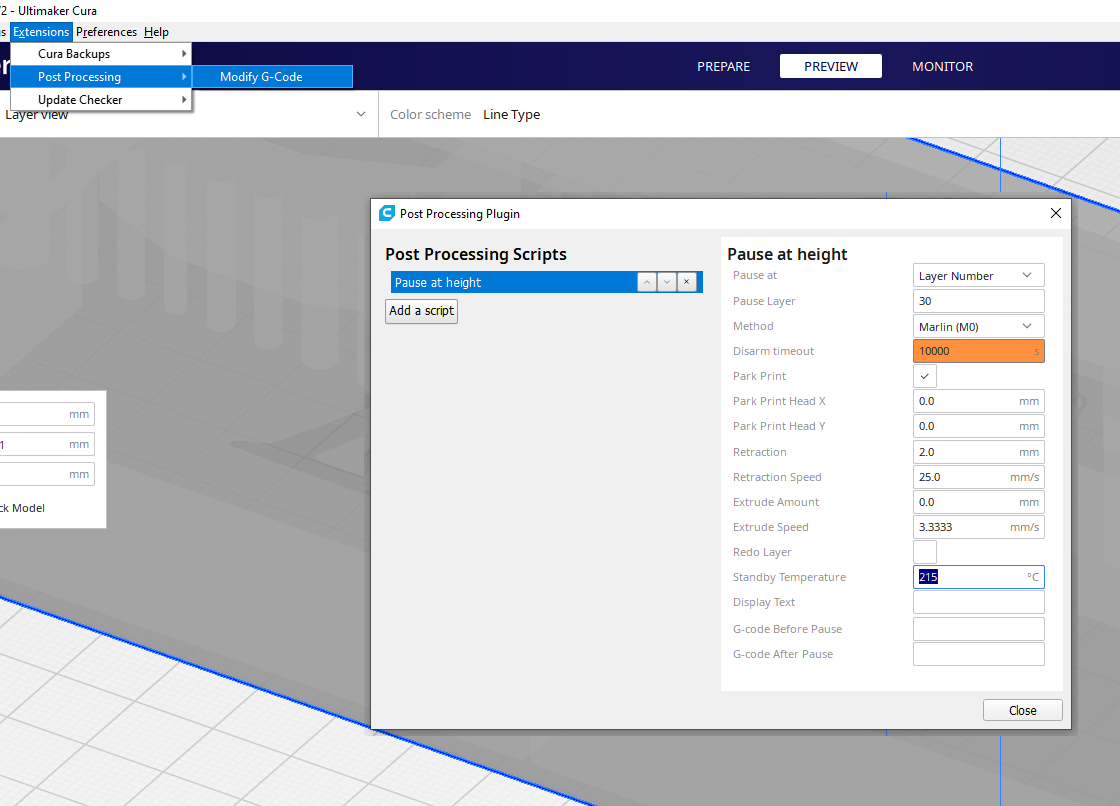
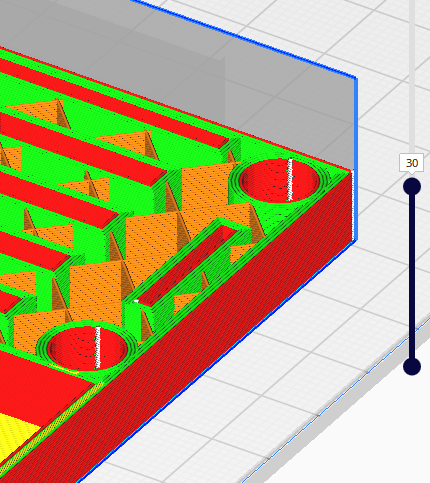
You will NEED supports on for the housing. The pockets for the magnets are 8mm diameter x 8mm tall, I used 6mm diameter x 6mm tall magnets in mine. After slicing, check the layer height the cylindrical cavity finishes (lets assume its 31) so layer 30 will be the last layer before it seals the cylinder cavity. If using Cura, click on “Extension” -> Post Processing -> Modify Gcode and run a “Pause at Height” command like I show in picture 5. This will tell the 3D printer that AFTER finishing layer 30, move the print head to location (0,0) lock the stepper motors, for 10,000 seconds, and keep the nozzle heated at 215C until you press resume. This will give you ample time to insert your magnets. MAKE SURE YOU CHECK POLARITY so they are aligned correctly with the housing if you printed that first. Most heating blocks are made of aluminum which is non magnetic, but if you are worried that the magnets might pop out, use a drop of super glue to lock them to the bottom of the print. When printing the housing, which is printed top side down, remember to flip your magnets.
The paint scraper divider is a print in place adjuster for those who use paint scrapers. Since I will not be able to make a configuration for all paint scrapers, I will let you place the scraper in the tray at the rear of the organizer. You can use some simple math to create the perfectly spaced scraper storage. When checking the scale of the organizer, it reads 21mm tall. The divider is 20mm tall, so set the divider Z Height to 1mm. If your scraper is 4” wide, that’s 25.4*4=101.6. Give yourself .3 both ways for horizontal expansion making that gap 102.2. Since the divider is 3.9mm wide, that puts its center at 1.95 from an edge. So if I eyeball the placement of the divider on the left side of my track, (~-88) I will add 102.2 + 1.95 and It should produce a snug fit. Add an extra .2 or .3 so it’s not as snug so I have a placement of X=16.45.
If you are worried about your horizontal expansion, or math when it came to the paint scraper placement, you can “sink” the organizer 2mm into the build place, removing the first 4 layers, and then print just the first three or so layers to see if your tools will fit. If you are not able to turn off the printer, you can run the same “pause at height” gcode as stated before to pause after layer 3 and then turn off the printer, remove the print, check size/tolerance, and then reslice @Z=0.
Here is the file by popular demand, my Magnetized 3D printer organizer. It was designed to hold all of my ender 3s and my Geeetech A30T repair hardware. Picture 3 shows the general layout of the tools and use for the cut outs. If you do not want the organizer to sit on your printer, you do not need to print the housing v2 file. I still find the stackable trays to be super helpful and I have a dozen around my work station.
You will get an email with a .zip folder. You will need a program like WinRAR to unzip it, load it into your slicer software and begin printing. The zip file will contain the following: Housing V2 (Green) Maintenance Tray V2 (Gold) SD Card Cap (Blue) Small Removable Stackable Tray (Red) Large Removable Stackable Tray (Purple) and Paint Scraper Divider (not shown)
You will NEED supports on for the housing. The pockets for the magnets are 8mm diameter x 8mm tall, I used 6mm diameter x 6mm tall magnets in mine. After slicing, check the layer height the cylindrical cavity finishes (lets assume its 31) so layer 30 will be the last layer before it seals the cylinder cavity. If using Cura, click on “Extension” -> Post Processing -> Modify Gcode and run a “Pause at Height” command like I show in picture 5. This will tell the 3D printer that AFTER finishing layer 30, move the print head to location (0,0) lock the stepper motors, for 10,000 seconds, and keep the nozzle heated at 215C until you press resume. This will give you ample time to insert your magnets. MAKE SURE YOU CHECK POLARITY so they are aligned correctly with the housing if you printed that first. Most heating blocks are made of aluminum which is non magnetic, but if you are worried that the magnets might pop out, use a drop of super glue to lock them to the bottom of the print. When printing the housing, which is printed top side down, remember to flip your magnets.
The paint scraper divider is a print in place adjuster for those who use paint scrapers. Since I will not be able to make a configuration for all paint scrapers, I will let you place the scraper in the tray at the rear of the organizer. You can use some simple math to create the perfectly spaced scraper storage. When checking the scale of the organizer, it reads 21mm tall. The divider is 20mm tall, so set the divider Z Height to 1mm. If your scraper is 4” wide, that’s 25.4*4=101.6. Give yourself .3 both ways for horizontal expansion making that gap 102.2. Since the divider is 3.9mm wide, that puts its center at 1.95 from an edge. So if I eyeball the placement of the divider on the left side of my track, (~-88) I will add 102.2 + 1.95 and It should produce a snug fit. Add an extra .2 or .3 so it’s not as snug so I have a placement of X=16.45.
If you are worried about your horizontal expansion, or math when it came to the paint scraper placement, you can “sink” the organizer 2mm into the build place, removing the first 4 layers, and then print just the first three or so layers to see if your tools will fit. If you are not able to turn off the printer, you can run the same “pause at height” gcode as stated before to pause after layer 3 and then turn off the printer, remove the print, check size/tolerance, and then reslice @Z=0.